这一篇继续完善webnotebook,如果你读过上一篇的内容,你应该知道怎么去挂载webnotebook日志和容器的远程访问,但是这些还远不够,webnotebook
总要和一些数据库打交道吧,比如说mysql,mongodb,redis,通常情况下这些存储设备要么是以容器的方式承载,要么是由DBA在非容器环境下统一管理。
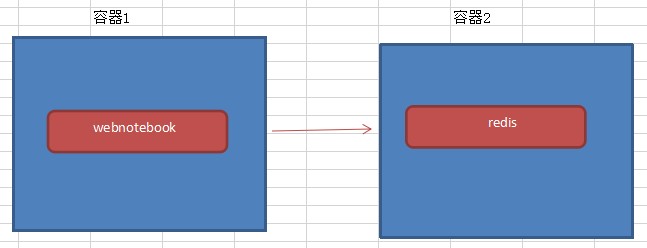
一:webnotebook连接容器redis
我们做一个小案例,把网站的所有PV记录到redis中,webnotebook前端显示当前你是 xxx 位用户,案例不重要,重要的是怎么去实现容器互联。
在docker hub 上去找redis的官方镜像,具体redis该如何合理配置这里我就不管了,用最简单的一条docker run 跑起来再说。
[root@localhost data]# docker run --name some-redis -d redisUnable to find image 'redis:latest' locallylatest: Pulling from library/redis6ae821421a7d: Pull complete e3717477b42d: Pull complete 8e70bf6cc2e6: Pull complete 0f84ab76ce60: Pull complete 0903bdecada2: Pull complete 492876061fbd: Pull complete Digest: sha256:dd5b84ce536dffdcab79024f4df5485d010affa09e6c399b215e199a0dca38c4Status: Downloaded newer image for redis:latested07890700a5cdb7d737a196c28009a9d1b08de35f55d51f53c80e6cfe6ba199[root@localhost data]# [root@localhost data]# [root@localhost data]# docker psCONTAINER ID IMAGE COMMAND CREATED STATUS PORTS NAMESed07890700a5 redis "docker-entrypoint.s…" About a minute ago Up About a minute 6379/tcp some-redis
接下来安装 StackExchange.Redis,在Index这个Action中将当前的访问作为一个PV记录到redis中,不过下面的代码要注意一点的就是,为了去访问redis,
这里我采用了redis.webnotebook.com 去映射到redis容器的ip,映射关系可以在创建容器的时候自动追加到 /etc/hosts 中,每一次访问都执行一次Increment自
增操作。
public class HomeController : Controller { public static Logger logger = LogManager.GetLogger("SimpleDemo"); public static ConnectionMultiplexer redis = ConnectionMultiplexer.Connect("redis.webnotebook.com:6379"); /// /// 读取mongodb数据数据 /// ///
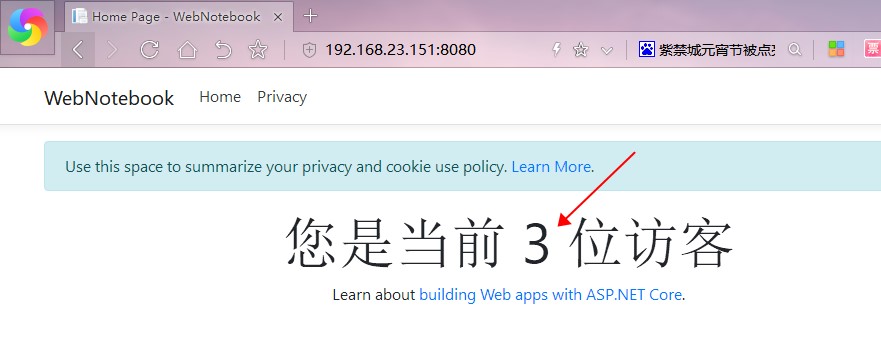
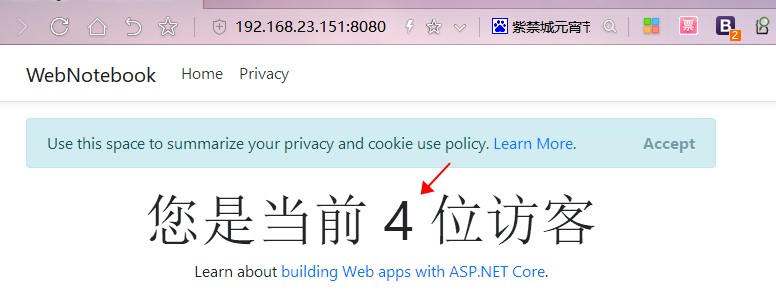
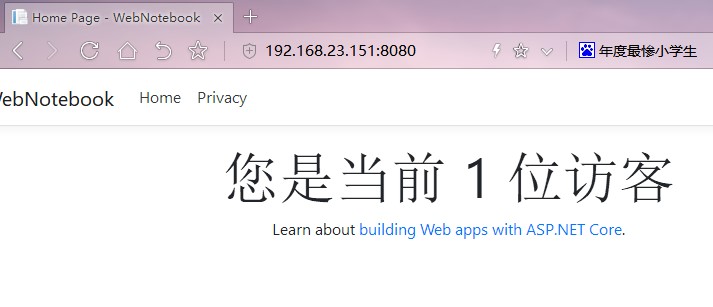
在UI上,展示下你当前是多少位访客,就是这样。
您是当前 @ViewData["num"] 位访客
Learn about building Web apps with ASP.NET Core.
然后你就可以docker build,完了之后docker run时通过 --link some-redis:redis.webnotebook.com 去指定一下就好了,some-redis是redis容器的名字,
redis.webnotebook.com 是这个some-redis别名,这样就方便的实现了 redis.webnotebook.com和容器ip的映射关系。
[root@localhost publish]# docker run -d --name webnotebook -p 8080:8080 --link some-redis:redis.webnotebook.com huangxincheng/webnotebook:v1b931e040de26c4bfc0b49cbc8e626cdcb30ad9bdff523f623c0a2d6c50899a81[root@localhost publish]# [root@localhost publish]# [root@localhost publish]# docker psCONTAINER ID IMAGE COMMAND CREATED STATUS PORTS NAMESb931e040de26 huangxincheng/webnotebook:v1 "dotnet WebNotebook.…" 2 seconds ago Up 2 seconds 0.0.0.0:8080->8080/tcp webnotebooked07890700a5 redis "docker-entrypoint.s…" 27 minutes ago Up 27 minutes 6379/tcp some-redis
有些人可能就好奇了,到底webnotebook容器内的/etc/hosts真的修改了吗? 接下来你可以通过 docker exec 到webnotebook容器去看一下就好啦,
从下面标红的地方可以看到,172.17.0.2 已经和 xxx.com 做了映射。
[root@localhost publish]# docker exec -it webnotebook /bin/bashroot@b931e040de26:/data# cat /etc/hosts127.0.0.1 localhost::1 localhost ip6-localhost ip6-loopbackfe00::0 ip6-localnetff00::0 ip6-mcastprefixff02::1 ip6-allnodesff02::2 ip6-allrouters172.17.0.2 redis.webnotebook.com ed07890700a5 some-redis172.17.0.3 b931e040de26root@b931e040de26:/data#
回到文章开头的问题,如果redis是在远程宿主机上部署的,那我的webnotebook容器该怎么访问呢?你可能会说,直接通过ip访问即可,但是为了保持
统一性,我还是希望通过redis.webnotebook.com 这个域名进行访问,也就是说怎么去把这个映射关系追加到容器中呢?可以使用-- add-host来实现。
[root@localhost publish]# docker run -d --name webnotebook -p 8080:8080 --add-host redis.webnotebook.com:172.17.0.2 huangxincheng/webnotebook:v191e7d9c1b575cc34ae98eebfc437d081b852f450104e2b368f898299852b0f18[root@localhost publish]# docker exec -it webnotebook /bin/bashroot@91e7d9c1b575:/data# cat /etc/hosts127.0.0.1 localhost::1 localhost ip6-localhost ip6-loopbackfe00::0 ip6-localnetff00::0 ip6-mcastprefixff02::1 ip6-allnodesff02::2 ip6-allrouters172.17.0.2 redis.webnotebook.com172.17.0.3 91e7d9c1b575root@91e7d9c1b575:/data#
二:docker-compose 容器编排
目前我们仅引入了redis,这样有了两个容器,但随着业务的增加,你可能还需要mysql,ssdb,rabbitmq,nginx等服务,而docker建议的就是一个容器
一个进程,那为了能顺利承载这些服务,你可能需要部署6个容器,如果你还是按照老一套的方法一个一个的去部署,操作起来就比较乱,有没有一种方式可
以让docker自动帮我们一键部署好这些容器呢? 就好像dockerfile那样自动化部署,当然有了,那就是docker-compose 容器编排。
1. 安装
官网地址: 然后按照步骤一步一步来就好了,最后通过docker-compose --version 看一下即可。
[root@localhost publish]# sudo curl -L "https://github.com/docker/compose/releases/download/1.23.2/docker-compose-$(uname -s)-$(uname -m)" -o /usr/local/bin/docker-compose[root@localhost publish]# sudo chmod +x /usr/local/bin/docker-compose[root@localhost publish]# docker-compose --versiondocker-compose version 1.22.0, build f46880fe[root@localhost publish]#
2. 编写docker-compose
docker-compose的所有命令都在 上面找得到,如果有兴趣可以查看一下。
version: '3.0'services: webnotebook: container_name: webnotebook build: context: . dockerfile: ./Dockerfile depends_on: - redis links: - "redis:redis.webnotebook.com" ports: - "8080:8080" redis: container_name: some-redis image: redis
上面的配置看起来不难吧,如果不知道参数的意思,还是那句话,查看官方文档, 最后你可以使用 docker-compose up --build 跑起来,或者使用 -d 参数
进行后台运行。
[root@localhost publish]# docker-compose up --buildBuilding webnotebookStep 1/9 : FROM microsoft/dotnet:2.2-aspnetcore-runtime ---> dad26d192ae6Step 2/9 : ENV TZ Asia/Shanghai ---> Using cache ---> 72535a350c5dStep 3/9 : LABEL author hxc@qq.com ---> Using cache ---> d4dcb4ba06aaStep 4/9 : RUN mkdir /data ---> Using cache ---> 6bbfc1537e42Step 5/9 : COPY ./ /data ---> Using cache ---> 5401b74ec21fStep 6/9 : WORKDIR /data ---> Using cache ---> d93e7949b527Step 7/9 : VOLUME /data/log ---> Using cache ---> 39c4285c6d6cStep 8/9 : EXPOSE 8080 ---> Using cache ---> d02932ddfbccStep 9/9 : CMD [ "dotnet","WebNotebook.dll" ] ---> Using cache ---> 0572ceea51a1Successfully built 0572ceea51a1Successfully tagged publish_webnotebook:latestStarting some-redis ... doneStarting webnotebook ... doneAttaching to some-redis, webnotebooksome-redis | 1:C 22 Feb 2019 09:11:03.160 # oO0OoO0OoO0Oo Redis is starting oO0OoO0OoO0Oosome-redis | 1:C 22 Feb 2019 09:11:03.160 # Redis version=5.0.3, bits=64, commit=00000000, modified=0, pid=1, just startedsome-redis | 1:C 22 Feb 2019 09:11:03.160 # Warning: no config file specified, using the default config. In order to specify a config file use redis-server /path/to/redis.confsome-redis | 1:M 22 Feb 2019 09:11:03.161 * Running mode=standalone, port=6379.some-redis | 1:M 22 Feb 2019 09:11:03.161 # WARNING: The TCP backlog setting of 511 cannot be enforced because /proc/sys/net/core/somaxconn is set to the lower value of 128.some-redis | 1:M 22 Feb 2019 09:11:03.161 # Server initializedsome-redis | 1:M 22 Feb 2019 09:11:03.161 # WARNING overcommit_memory is set to 0! Background save may fail under low memory condition. To fix this issue add 'vm.overcommit_memory = 1' to /etc/sysctl.conf and then reboot or run the command 'sysctl vm.overcommit_memory=1' for this to take effect.some-redis | 1:M 22 Feb 2019 09:11:03.161 # WARNING you have Transparent Huge Pages (THP) support enabled in your kernel. This will create latency and memory usage issues with Redis. To fix this issue run the command 'echo never > /sys/kernel/mm/transparent_hugepage/enabled' as root, and add it to your /etc/rc.local in order to retain the setting after a reboot. Redis must be restarted after THP is disabled.some-redis | 1:M 22 Feb 2019 09:11:03.161 * Ready to accept connectionswebnotebook | : Microsoft.AspNetCore.DataProtection.KeyManagement.XmlKeyManager[0]webnotebook | User profile is available. Using '/root/.aspnet/DataProtection-Keys' as key repository; keys will not be encrypted at rest.webnotebook | Hosting environment: Productionwebnotebook | Content root path: /datawebnotebook | Now listening on: http://[::]:8080webnotebook | Application started. Press Ctrl+C to shut down.
非常简单吧,只要我有一个docker-comose文件就可以实现一键部署,好了,希望本篇对你有帮助。